Showing posts with label Stampington. Show all posts

April 13, 2011

A touch of nostalgia


I made this using a supplies from Stampington & Co. For directions on how to make this card pocket folder please go here.


frozen in time
I see an old friend
from way back
he is looking in the window
of a store on Grafton street
his image tight
never older
I am looking from above
leaning from a small wooden chair
in Bewely’s mezzanine
and he doesn’t see me
he doesn’t even remember

those days, ‘Dublin
in a rainstorm in the summer
keeping warm’. But I remember it
I remember his thin shoulders
would pull up when he laughed
bending at the waist towards me
the smell of his leather jacket
I thought we would never make 19

‘we’ didn’t
but 'I' did

that was the year I met
the true love that
misses my shape when
when I am late for bed,
that knows my face
older now and loves me more.


‘Dublin in a rainstorm in the summer keeping warm’
- a line from my favorite Sinead O’Connor song ‘Troy’

December 01, 2010

Workshop Wednesday - Inchie Gift Tags


As part of my December commitment to making art every day I am working with some old photos and documents from my dad's side of the family. I have a few ideas in the works, but out of that effort came something functional - inchie gift tags.

I was so lifted up by the comments left for me on my last post that I feel better about things (thank you folks), and so thought I would go ahead a stick with my blog schedule and share my process of making these quick and simple gift tags.

I have a whole section on working with inchies in my book, The Artistic Mother, starting on p115.

Supplies:
Cardstock - various shades of while, cream and beige
Scanner, printer (printer ink of course)
One inch hole punch
Glue stick
Scissors or paper trimmer
Hole punch
Twine
Personal vintage photos


A) CREATE YOUR OWN BACKGROUNDS (optional)

STEP 1

Gesso the middle of a piece of old book paper. Dry really well with a craft heat tool.


STEP 2 (optional) 

Write a poem on the gesso with ink.


STEP 3. 

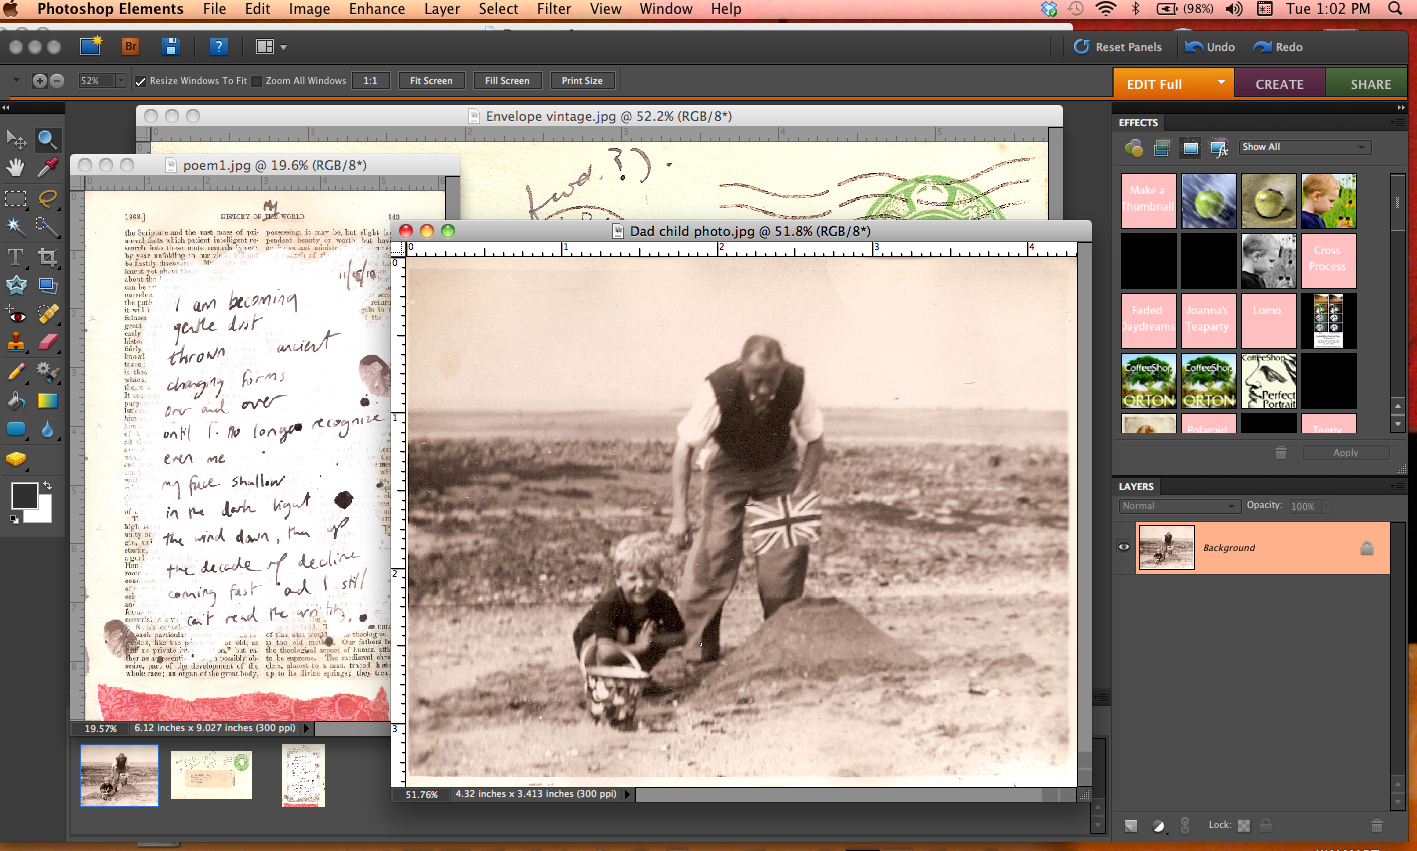
Choose some vintage photos and documents to compliment your poem.


STEP 4.

Scan your images in to your computer. Crop and re-size as needed.


STEP 5.

 Lay your images out in Word together.


STEP 6.
Print your images onto cardstock.


B) CREATE YOUR INCHIES

STEP 1. (the only step in this section!)

 Use an inch square punch to punch out 'inchies' from the images you printed. I like to use my own photos and poems so that the art work is really mine. TIP: I turn my hole punch upside down so I can see what I am punching.

NOTE. If you don't want to create your own backgrounds specifically for this project, you can join in at this point and use whatever you have on your craft table to make the inchies:
~ Your kid's art
~ Scrapbook paper
~ Catalogs, newspapers, old books
~ Your own printed photos
~ Pages from your journal
~ Some of your 'failed' paintings
~ Doodles
~ Wrapping paper
~ Old Christmas cards


C) CREATE YOUR GIFT TAGS

STEP 1-4.
1) Cut cardstock to your desired tag size. Mine are aprox 2 1/4 by 4 1/2.
2) Draw slanted lines on the top of this panel. I used a block turned like a diamond to draw my lines (does that make sense?).
3) Trim the card along the lines to create the tag shape.
4) Make a hole with a round hole punch, I can never get my holes dead center!!!

STEP 5-7.
5) Stamp your tag. I used 'Ledger Flourish' by Stampington & Co. and black Staz On ink.
6) Glue on 2 inchies at the base of the tag, over the stamp. I added inchies randomly to each tag, not thinking too much about what 'should' go together.
7) Add twine. I used orange 'Divine Twine' also by Stampington & Co.

Experiment with different colored papers and make a bunch all at once, it should only take an hour and it is a nice way to add a personal arty touch to Christmas gifts.


I will be posting photos of my December create everyday journey tomorrow & everyday after that for the month of December. I will also try to stick to my normal blog schedule, as the mood takes me. So on Friday I will do my regular Art Finds Friday Post.

Here's to a creative December. If I can do it, so can you.


April 03, 2010

Starter Kit Giveaway & Vision statement art (Week 4 project alternative)

This week on Stampington, via the Artisan Avenue 'Project of the Month' section of their website, my Canvas Goals Book was featured. They show photos of the project and list all the supplies you need to make it!

In my book 'The Artistic Mother - A Practical Guide For Fitting Creativity into Your Life' I talk a lot about the importance of having a vision and setting goals for your art. In Week 4 of the workshop section of the book, I outline creating a Vision Statement banner to hang up in your home somewhere to remind you of your vision and goals. If you are doing the workshop and don't have space to hang a banner, or would rather something that you can touch then this is a good alternative to that project.

In nutshell I decorated each of the pages of a pre-made canvas book, sewed and glued on the collages and then sewed the pages together to form pockets.:


Then I made the vision statement and goals lists collages on cardboard to insert into the pockets. Front of the cards:


Back of the cards:

I used 3 different methods for each of the cards:

1) I printed the vision statement directly onto one of my handmade backgrounds, glued it on the cardboard panel and collaged over that:

2) I printed the long term goals list onto painted paper, trimmed it and layered it over other papers as part of the collage:

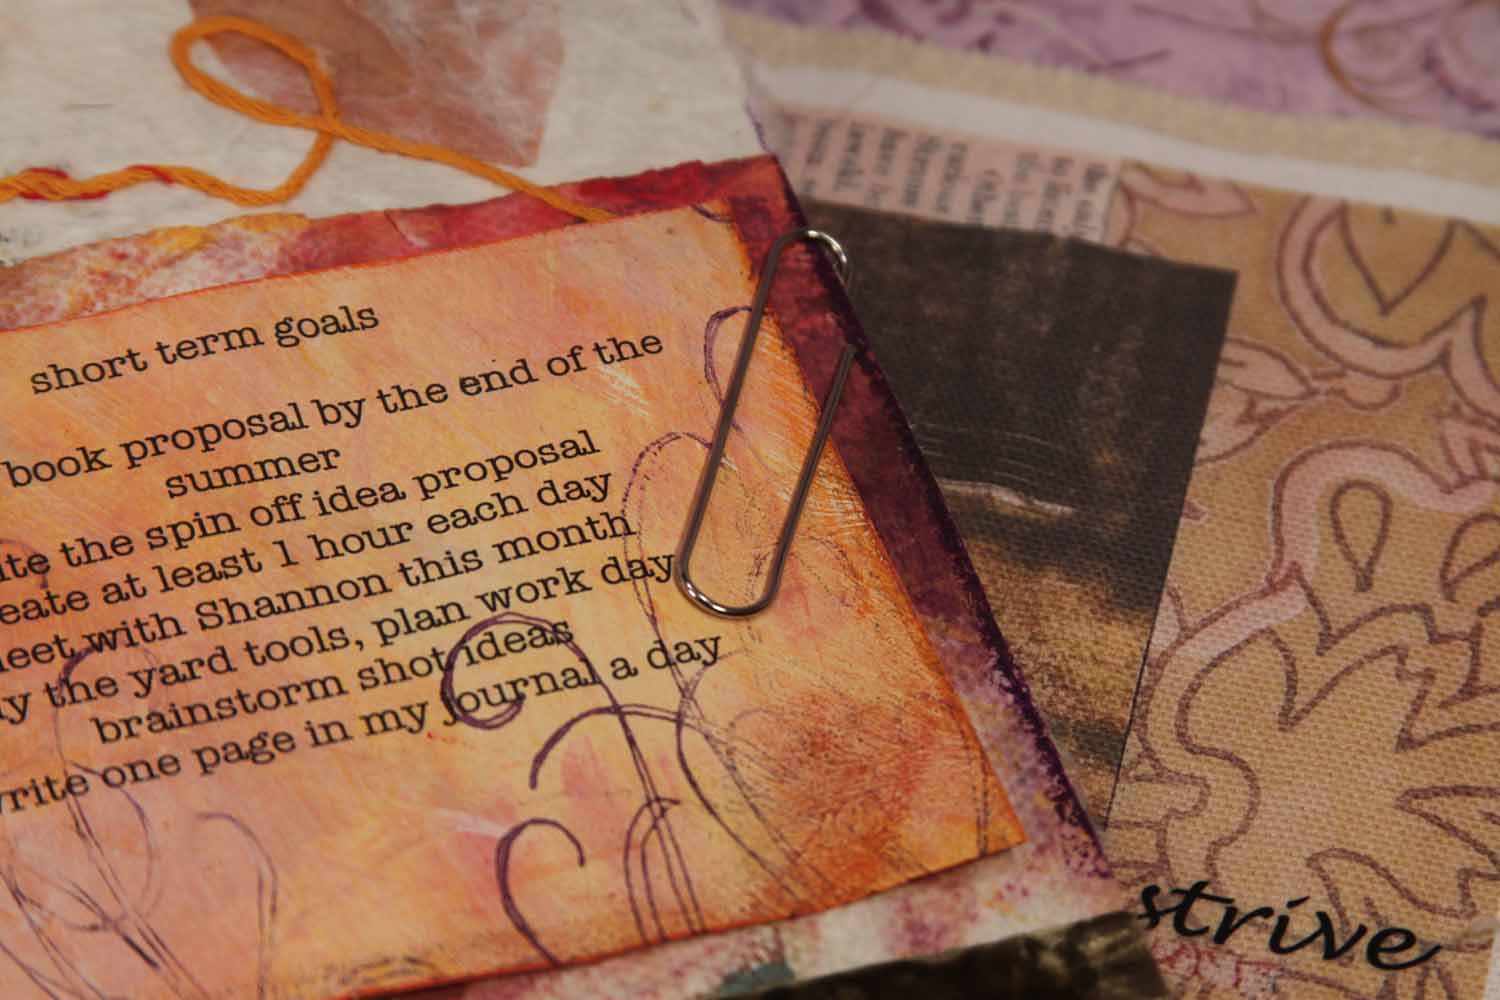
 3) For the short term goals I printed them onto my handmade background papers, but as it will change soon I didn't glue it on, instead I simply attached it with a large paper clip. That way when I meet these goals I can add new ones!

I put ribbon handles on the top of the cards, and put them inside the pockets of the book:


I used my own photos printed small and layered on the collage. Here is back detail:


For the cover I printed a copy of my blog banner onto canvas and sewed it on:


Visit Stampington to see some of the supplies that I used in this project.

****************

Now for the 'Starter Kit' Giveaway:

In my book I suggest you buy a number of art supplies in order to complete the Workshop in chapter 5. I tried to keep the supplies to the minimum so that you would be more motivated to actually do the the workshop and not have to keep running to the craft store to buy what you need! I thought that I would giveaway some of the supplies as a starter kit!

Here are the rules:
1) Anyone can enter to win these supplies, you don't have to have my book (but of course I would love it if you did, that way I know these supplies are going to their intended use :)
2) Leave a comment in this post.
3) Comments will close at noon on Thursday April 8 and then I will draw for the winner.
4) If you add me to your blog roll (or already have) you can leave a 2nd comment and have a second chance of winning. But you must leave me 2 comments to be entered twice.
5) If you win, I will announce it here next Thursday and you can send me your address and I will mail you your supplies.


Here are the supplies in this 'Starter Kit' (pictured right plus the oil pastels pictured below right):
These are all part of the essential tool box suggested in my book:
1) A box of my favorite water soluble oil pastels - Portfolio Series by Crayola
2) X-acto craft knife with #11 blade
3) an 8oz tub of gesso
4) A tube of gel medium - which can be used as a glue and a varnish
5) 4B pencil
6) 4 sheets of my stamped handmade papers to add to your 'Art Stash'
7) My favorite glue stick - Scotch Permanent Glue Stick

Project related things:
8) A Daler Rowney 80 page, 5.5 x 8.5 sketch book/journal (for Week 2 project in my book's workshop)
9) 9 4x4 fabric squares (for Week 3 project)
10) Balsa wood (for Week 5 project)
11) Butterfly image sheet (for Week 5 project)
12) A 6x8 canvas panel (for Week 6 project)

I have 4 of these kits to give away this month, one per Saturday. If you don't win this one you can try again next week! And again, you don't have to own my book to enter ~ as long as you will use them in the next year to make something I am happy!

NOTE on the products - These were not donated by anyone, I purchased them myself and unless stated I do not recommending them over another company's products. In fact I have never used this brand of gesso or gel medium! I am sure they are good though. I have used this brand of craft knife, canvas, glue stick and Water soluble oil pastels. The sketch books turned out a little bigger and fatter than I imagined, but all the more for you and they have perforated tear out pages which is a nice touch! 

Visit here to win a copy of my book on Jenny Doh's blog, it ends today April 3! 

March 29, 2010

Published in Stampers' Sampler


I just love the new look of Stampers' Sampler Magazine by Stampington & Co. You have to check it out. Even though I have been an Artist On Call for them for 3 years now I never get tired of finding out that something I made will make it into print! I was so delighted to get this magazine in the mail and find out I was a part of it.

The photography in this publication is top notch and they show so much more of the cards. That is not to mention the lovely layout. Really big improvement. Kudos to Amanda Crabtree, the editor and her team.


Here is my two page spread. I made a series of these cards using Jenny Doh's new stamp line. I did a post about making one of these cards a while ago.


I saved one of the cards for myself:


*************

I am so unhappy that Blogger has, in it's bid to improve itself, taken away the HTML editing capacity. I like to see my photos big and to do so I was manually changing the size in HTML - it was working just fine. Then on Friday I got an email talking about 'blogger in draft' and some new templates that let you do more without HTML. But the templates don't work for big pictures, so I kept my old template but have found that in the old template the HTML option is now GONE. So now I can't make them bigger (well, I did drag them bigger but they looked pixelated, horrible!). Has any one else come across this? It is just me? Is there a solution?

UPDATE - got it sorted, thanks to Peggy and Trudy for pointing me in the right direction!!!! Somehow I had switched editing mode in settings to 'Hide composite mode' which does not have HTML and needed to switch back to the 'updated editor' which does. I was able to do that in settings. phew!

*************

Oh and check out these articles:

1) I am a 'Guest Curator' on CRESCENDOh this week! My Art Saves article on CRESCENDOh, getting down and personal!

Also on the main page each day this week I am linking to 2 wonderful artists. So please visit my links there, you will be inspired by them.

2) Please visit a wonderful book review and recommendation by Disney of Ruffles and Stuff. She has lots of great quotes from folks at Trudy's Artistic Mother Group! Thanks Disney (and Trudy for the group, have I said thank you enough?)!

If you are visiting from either of these places, I welcome you, stay a while, visit, leave me a note to say hello! I do try to visit everyone who visits me.

And if you want some cool (free) mixed media supplies - remember to check back here on Saturday to sign up to win my book's Starter kit!

March 20, 2010

Green Craft frayed flowers


I fell in love with these fabric flowers by Maize Hutton (Maize, what a lovely name) in Green Craft magazine Vol. 2 as soon as I saw them. I really wanted to have a go at making one, but I am not a big flower wearer. Then it dawned on me that I could use the flowers to embellish my tote bag! This tote is another version of the one in my book, The Artistic Mother!


So I followed Maize's steps and this is what I came up with:


Step 1
First I cut a strip of fabric 1 x 36 inches.


Step 2
Then folded one end over and put a stitch in it.


Step 3

I sewed a running stitch all the way along the top of the strip.


Step 4
And pulled the thread and gathered the strip into a circle. I had to avoid the temptation to pull it too tight. I kept it loose and let the fabric find it's way.


Step 5
I loosely sewed the 'flower' in place.


Step 6
I took a while to choose a button for the center, color choice, color choice *sigh* Finally, I sewed it onto the center of the flower.


Step 7
I pinned it on my tote bag!

Here is the before and after, I think this tote bag was just waiting for this flower!


(yes, that is that grumpy little Shona photo I keep using. I have my reasons :)

Thank you Maize for the inspiration!


************

Remember to enter my Studio's magazine giveaway!


************

And coming in April I will be doing a weekly giveaway of 'starter kits' for my book, which will include supplies that will get your started on the projects in my book - included in the starter kits will be gesso, water soluble oil pastels, 4B pencil, some papers decorated by me and more!

March 15, 2010

Rubber stamps I use


What is your favorite stamp? That is a hard question to be sure. I have many stamps that I use over and over. As you can see from this photo I don't take very good care of them! I know I should, but when I am making something I stamp almost without thinking and then forget to go back and clean the stamp. I primarily use Staz On ink and it dries fast.

Sometimes I use whole stamp image, but sometimes I use only a part of the stamp. I strive to use them not as focal images, but as a support for my own words, images and collages.


For example below I used only the edge of the flowers of this stamp (Blooming Contessa', by Sandra Evertson)


I like to edge my pages with partial stamps (Word stamp from Collage Cube by Christine Adolph):


The majority of my stamps come from Stampington & Co., some of which I used when I made the projects and images for my book, 'The Artistic Mother'. If you get a copy you will see the following ones:

On the cover:
1) 'Elegant butterfly' from Garden Melange collection by Christine Adolph

2) 'Recommendation' by Carin Andersson

3) 'Word heart' - on the Romance heart cube from Romance Collection by Christine Adolph

4) '3 Flowers' from Clearly Impressed - Fresh Flower Elements by Christine Adolph

5) 'Swirl' from Clearly Impressed - Swirls by Michelle Ward

Inside:
6) 'Wrought Scroll' by Christine Adolph

7) 'Blooming Bold' from the Clearly Impressed Fresh Flowers by Christine Adolph

8) 'Honeycomb' on the collage cube from Fresh Flowers by Christine Adolph

9) 'Butterfly' from Clearly Impressed Rock and Roll by Michelle Ward

10) 'Blooming Contessa' by Sandra Evertsen

11) 'Twig or branch' from the Clearly Impressed 'Bird Sactuary' by Michelle Ward

12) 'Romance Heart Cube' by Christine Adolph

13) 'Holiday cube' by Christine Adolph

14) 'Balloon' from Clearly Impressed 'Out of the Hurly Burly' by Sandra Evertson

15) 'Elegant Poppies' by Sandra Evertson


I have bought non Stampington & Co. Stamps too! Here are some of my favorites:

1) 'Harlequins' by Stampiliabities'

2) 'Star' by Stampin' Up

3) 'Branch' by Stampers' Anonymous (their online catalog p130)

***Note - Clearly Impressed stamps from Stampington are unmounted and clear. You need acrylic blocks to mount them on when you want to stamp (although I have been known to mount them on the back of other wood mounted stamps!). When you are done you put them back on the clear plastic sheet they come in. I like these because they don't take up too much storage room.***


Do you have a favorite stamp, can you leave me a link to the stamp or the artwork?

March 10, 2010

Creative beginnings

Let me introduce Somerset Apprentice.


It "is a much more basic and thorough understanding of techniques geared toward people who aspire to make Somerset-esque art but need to learn the fundamentals through easy-to-understand instructions and close-up photos. We teach you the artful building blocks focusing on the basic how to's of amazing artwork." Stampington & Co.

This magazine is close to my heart. We all have to start somewhere. I remember when I started out doing mixed media, I poured over the techniques in Somerset Studio and books like Claudine Hellmuth’s Collage Discovery Workshop and Karen Michel’s ‘Complete Guide to Altered Images’ following the directions, trying out everything I read. Of course I ended up with a bunch of art pieces that looked like theirs, but no matter, it was a platform of skill off which I could leap and find my own voice.

This magazine is perfect for Moms like me who can’t take off and go to workshops or night classes, who are fitting art into their real lives. You can take the magazine with you to watch your kids classes, or on a picnic while they play. Then at home when the kids are busy, asleep or whatever you can try out the techniques, step by step.

There are many great articles in this publication by some wonderful artists. Even though they are meant to be to get you started I have found that I still benefit from reviewing the basics and affirming the techniques I have developed.

I have a small feature in this magazine about getting the creative juices going & choosing my color pallet for a project. Thank you to Jana Holstein for the invitation to share what I have learned.

The vision of Somerset Apprentice ~ to help the next new wave of mixed media artists in the door is something I strongly believe in, and was a major fuel for my book writing. But I want to not only come along side new artists, pry the creativity out of the shy, but energize the oldies (like me) ~ I have had my fair share of creative ruts and have found going back to the basics, to the essence of my art vision can ‘bring back that loving feeling’!

Thanks to Shannon Mucha for the photo above, of the magazine. I love that peek at the background papers you made Shan :) Even though Shannon is a seasoned artist, illustrator, photographer and all around artistic mother she is going to go through my book's workshop with Trudy Callan's Artistic Mother Art Group! I am so excited now as photos are starting to roll in of the things that those women are making!

If you happen to be doing the workshop on your own, feel free to add any photos to the Artistic Mother Flickr group that I am hosting. The journey has just begun, don't be worried if you don't like what you have made, we all started somewhere.

Can you remember your creative awakenings – first awakening or post-block awakening? Wanna share?

February 28, 2010

Coffee cup holder book & Giveaway #12

I am loving this Green Craft magazine. It lays around my house and I keep on peeking in. I want to use what I have. I want to practice re-purposing. I have never liked waste, wasted food, wasted clothes, wasted paper. Equally I don't like having useless stuff around. I am not a pack rat. So if I make something out of the old I am not wasting and I am making useful. Perfect solution.

It is also perfect for me 'cause, as a busy Mom who lives 20 minutes away driving 50 miles per hour from the nearest craft store, when I need to create I can't just get up and go. I have to use what I have.

So, this time I was inspired by Linda Manning Findley's 'cup holders for Christmas'. She said "You can use the cup holder as a card, tag or small book" - small book, that won me over! I am a sucker for a small book.


So I made these for my girls. I am going to write a poem for each in them.


Here's how:


First - prepare the coffee holder:
1) flatten out the filter and cut the right hand side to make an opening.
2) paint the front with craft paint
3) paint the back, as it has ridges I just dusted, rather than coated the back
4) fold over and stamp on the front, as usual I used Staz On ink, my favorite - you have the bones of your book cover


Second - prepare the decorative image
5) stamp the image onto some painted paper or other colored paper, I used the heart from Clearly Impressed 'Romance Elements' by Christine Adolph
6) Cut out the image and add some paint if needed
7) Run the edges of the image along the ink
8) Glue it on to the center of your book cover


Last - Add the pages
9) use the book cover as a template and cut out 3-4 strips of paper. Fold over in the middle
10) stitch the pages to the cover at the crease in the paper

There you have it:


This photo was taken on a background of new scrapbook paper from Christine Adolph by Creative Imaginations, this will be carried by Stampington & Co.

Thanks to Linda for the inspiration and the permission to post this for you guys!


~~~~~~~~~~~~~~~~~


To thank you for following along with my artful journey & the celebration of the launch of my book I am doing these regular Saturday giveaways!

This week the winner is

Kendall at Finesse Your Nest

Congratulations!

You get to choose one of the following gifts:

Choice #1 - Handmade notebook, aprox 3x6 inches


Choice #2 - 5 painted, randomly stamped papers for you to cut up and use in your own art work


Choice #3 - A wall hanging on a vintage hanger aprox 14x10 inches


If you are not listed as a follower of this blog, please do sign up, the more the merrier!

After this one I will be doing one more giveaways, March 6, to celebrate my book's official publication date (March 8th), even though the book is already available in the US. Then I will take off a few weeks. In April I am going to do 4 Saturday giveaways, the prize being kits that can be used to get started on the workshop in my book! I think that I will open those giveaways to comments so that I can be sure the kits go to folks that are interested in receiving mixed media supplies. I am still mulling it over.

LinkWithin

Related Posts with Thumbnails

Search This Blog