Showing posts with label tutorials. Show all posts

December 08, 2010

Workshop Wednesday - Mini calendar holder (with download!)


I loved making this project. I love this mini calendar. I love that is it not digital, but tangible. I love mini anything.


So here are the steps to make your own:

PART A - CREATE THE CALENDAR HOLDER COVER


STEP 1
Scan in your vintage photos and collage to your computer. Save as jpegs.


This is photo is of my maternal grandparents sitting on a blanket with a friend. Granny and Grandpa Kelly are the ones on the left. They look so happy. Grandpa died when I was 11. Granny Kelly was always so happy and enthusiastic about our family. Once she told me if she had been younger she would have liked my Mark. And man, she would have LOVED my kids. I can hear her saying 'Oh Shona, they are so lovely'. I know she would have been proud of me. One day in heaven we are going to have a time catching up!!!
Before she died she bought us the fridge we still have. I was meant to get a new one this Christmas as part of my kitchen re-do, because it is white and my kitchen black. But I just can't get rid of it! I asked for computer speakers instead.

Anyhow, on with the tutorial....


STEP 2
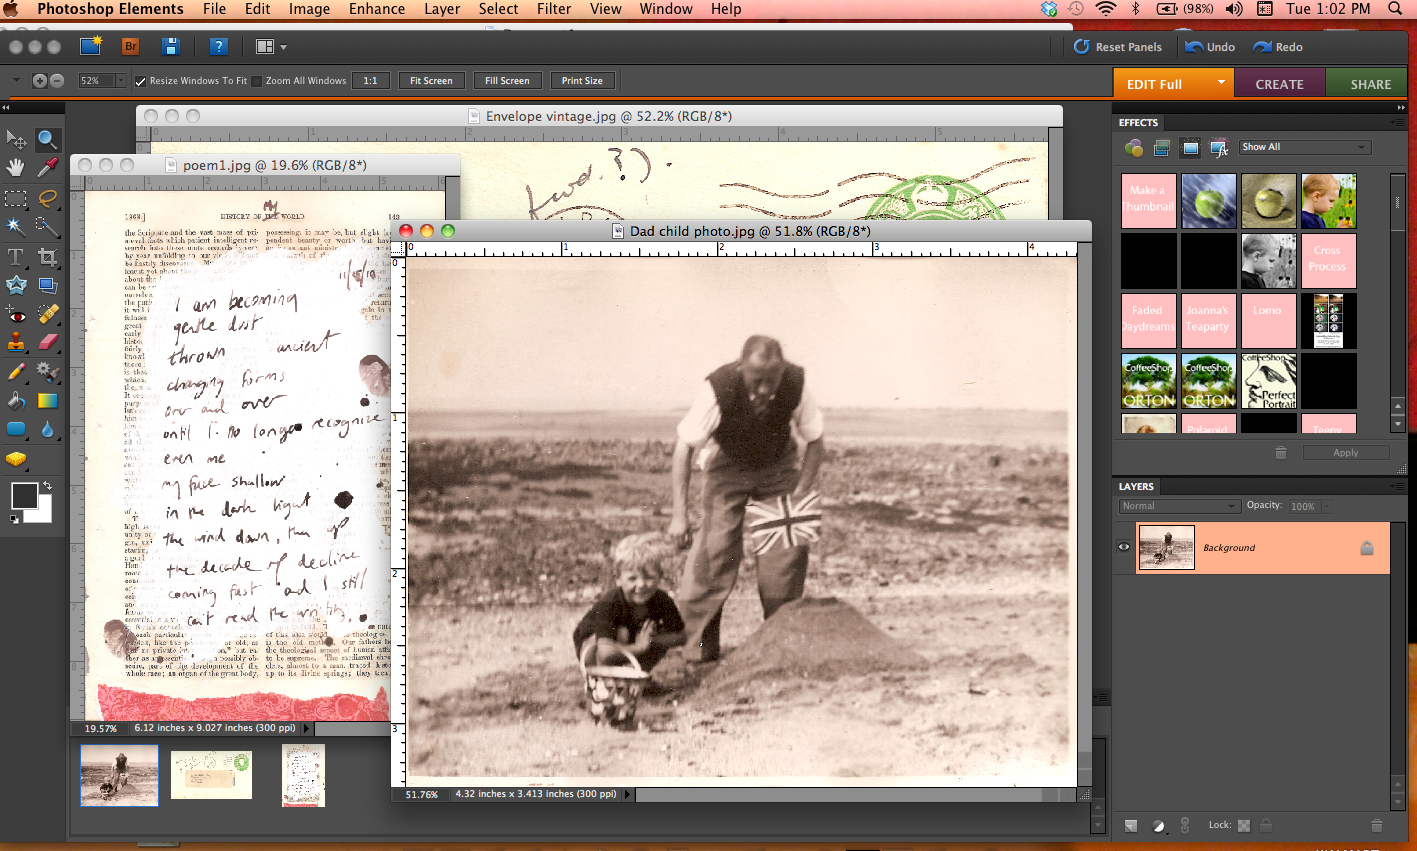
In Photoshop Elements (PSE), or other photo program that can combine photos, open all the images that you want to combine.


STEP 3
I use PSE 8, so here is what I did, it is the same procedure for other versions of PSE: In PSE open a new file. I always set the dimensions pretty big, like 4000x4000, 72dpi so I have room to play. (My regular image files are much larger than scanned images, but I prefer to use the dimensions I always use.)


STEP 4
Drag each file over into the new image. (You may notice, that after I added in my collage file I then rotated the original 180 and picked a portion of it to drag over)


STEP 5
 Line them up side by side, you want to make a long narrow image combo.


STEP 6
Crop the image, flatten all the layers and save as a new jpeg.


STEP 7
Open this image in Word. Re-size the image so that it is and print onto heavy cardstock. My calendar holder image was 7 1/4 x 3 3/4. Cut this card out and fold in half.


STEP 8
Inside of folder

Add a pocket to the inside of your holder. Add some collage elements to this pocket, and possibly some rubber stamps and a paper clip. This will be where you store your mini calendar.


PART B - CREATE YOUR MINI CALENDAR 

**You can download my Mini Calendar and skip to Step 7!**

STEP 1
I am sure there is an easier way of making a calendar, but I am most familiar with Microsoft Word, so that is what these steps cover:
Open a new blank document.

STEP 2
Insert a Text box.

STEP 3
In the text box create a table. Format it to 7 columns and 8 rows.

STEP 4
Open a copy of the 2011 calendar and type in January's dates on the appropriate days. Choose a font you like. I used Kingthings Trypewriter (not a typo) from Dafont.com. I love this font and it is free!


STEP 5
This is the scan of a rubber stamp that I carved from a photo I took!
Add an image you may like.


STEP 6
Download a PDF of this calendar here!
 Copy and paste January and adjust to create February and so on.


STEP 7
Print this onto cardstock. Trim.


STEP 8 (finally)

Insert the mini calendars into your pocket, minus the one you are using - one of the months will clip onto the front of the pocket inside the folder!


It took me a long time to create this calendar, so to save you that time, why not use my mini calendar?


It's a free PDF for you to use for your personal projects.  

I added a paper circle around my people after I printed the folder.

back view of my Mini Calendar Folder


December 01, 2010

Workshop Wednesday - Inchie Gift Tags


As part of my December commitment to making art every day I am working with some old photos and documents from my dad's side of the family. I have a few ideas in the works, but out of that effort came something functional - inchie gift tags.

I was so lifted up by the comments left for me on my last post that I feel better about things (thank you folks), and so thought I would go ahead a stick with my blog schedule and share my process of making these quick and simple gift tags.

I have a whole section on working with inchies in my book, The Artistic Mother, starting on p115.

Supplies:
Cardstock - various shades of while, cream and beige
Scanner, printer (printer ink of course)
One inch hole punch
Glue stick
Scissors or paper trimmer
Hole punch
Twine
Personal vintage photos


A) CREATE YOUR OWN BACKGROUNDS (optional)

STEP 1

Gesso the middle of a piece of old book paper. Dry really well with a craft heat tool.


STEP 2 (optional) 

Write a poem on the gesso with ink.


STEP 3. 

Choose some vintage photos and documents to compliment your poem.


STEP 4.

Scan your images in to your computer. Crop and re-size as needed.


STEP 5.

 Lay your images out in Word together.


STEP 6.
Print your images onto cardstock.


B) CREATE YOUR INCHIES

STEP 1. (the only step in this section!)

 Use an inch square punch to punch out 'inchies' from the images you printed. I like to use my own photos and poems so that the art work is really mine. TIP: I turn my hole punch upside down so I can see what I am punching.

NOTE. If you don't want to create your own backgrounds specifically for this project, you can join in at this point and use whatever you have on your craft table to make the inchies:
~ Your kid's art
~ Scrapbook paper
~ Catalogs, newspapers, old books
~ Your own printed photos
~ Pages from your journal
~ Some of your 'failed' paintings
~ Doodles
~ Wrapping paper
~ Old Christmas cards


C) CREATE YOUR GIFT TAGS

STEP 1-4.
1) Cut cardstock to your desired tag size. Mine are aprox 2 1/4 by 4 1/2.
2) Draw slanted lines on the top of this panel. I used a block turned like a diamond to draw my lines (does that make sense?).
3) Trim the card along the lines to create the tag shape.
4) Make a hole with a round hole punch, I can never get my holes dead center!!!

STEP 5-7.
5) Stamp your tag. I used 'Ledger Flourish' by Stampington & Co. and black Staz On ink.
6) Glue on 2 inchies at the base of the tag, over the stamp. I added inchies randomly to each tag, not thinking too much about what 'should' go together.
7) Add twine. I used orange 'Divine Twine' also by Stampington & Co.

Experiment with different colored papers and make a bunch all at once, it should only take an hour and it is a nice way to add a personal arty touch to Christmas gifts.


I will be posting photos of my December create everyday journey tomorrow & everyday after that for the month of December. I will also try to stick to my normal blog schedule, as the mood takes me. So on Friday I will do my regular Art Finds Friday Post.

Here's to a creative December. If I can do it, so can you.


November 17, 2010

Workshop Wednesday - Tin & book

A few weeks ago I asked you, my readers, if there was anything that you wanted to see by way of workshops. Donna wondered if I have done videos of work that is in my book, The Artistic Mother. That is a great idea Donna. Thanks. While I didn't get around to doing a video, here is a photo workshop based on an altered tin and handmade mini collage journal that does appear in my book.

Through out my book there are what is called in the publishing business 'beauty shots'. Marissa Bowers, the book's designer, staged art work with props to best show off and illustrate the type of artwork you, the reader, the Artistic Mother, could do. On p 18 is an altered collage tin that houses a little handmade book. Today I am going to show you the steps for making one.

But first, here is a peek inside the one that appears in the beauty shot in my book:


STEP 1

Set up your photos on your computer. I use PhotoShop Elements 8.0. I opened 4 different photos and then choose a new blank document. I moved the 4 photos over into the new document.


Line the photos up, then crop the image in a long strip and save the file as a jpeg.


STEP 2

Open your word processing program. I use Microsoft Word for Mac. Insert your photo onto a new blank document. Re-size your image. Copy and paste it and re-size the 2nd image (smaller), so you have 2 sizes of the image (one will be for the cover of your little book, the other will be art to collage the tin with).

STEP 3

Trim your images. And set the smaller image aside. You will use the larger strip image as the cover of your book.

STEP 4


Fold your strip image loosely in half, this will be your book cover. Find scraps of paper that will fit as pages in the book.


Layer the papers together. The top piece of paper should face the rest of the paper.

STEP 5

Poke a line of holes in the papers. Use an awl to make the holes by holding the point of the awl in place and tapping the back of the awl with a hammer to ensure that the holes go the whole way through the stack of papers. Hold the papers very tightly together before sewing. TIP: Thread your needle before poking the holes, so you are ready to go once the holes are made. Now, sew the papers together. I sewed forward and then back again to make sure the papers were very secure.

STEP 6


Put the book pages (signature) into the cover, fold the front and back signature pages and align them with the cover. Glue the outside of the signature into the book cover. Use your fingers to smooth the signature in place.

To cover up where the fold is, add a little loop of coordinating twine and tie it. Set the book aside.

STEP 7

Next you will want to alter your tin. I used a gift card tin that I got at Michaels, but an Altoid tin will work too. First thing to do is sand the tin. Any grit sandpaper will do, but I used a medium fine grit. Sand everywhere that you want to be painted. You don't have to erase the whole design, but to rough it up enough to receive paint.

STEP 8

Paint your tin with a layer of gesso. Dry it with a craft gun or simply wait 10 minutes for the paint to dry and then paint with acrylic paint. I used Moss Eco-Friendly paint.

STEP 9

 Stamp the tin with Staz On ink. I always use Staz On ink because I end up painting over the stamp. This stamp is called 'Plume' from Linda Schnieder's collection by Stampington & Co.

STEP 10


Over paint the stamps with another color (here I used a little bit of turquoise) and then gesso to soften the color. Rub the paint with a rag to give it that blendy, airy feeling.

STEP 11


Pick out some scraps to collage on the top of the tin, including the smaller printed out version of the book cover photo. Glue them in place.

Put your little book inside your tin and that is it!


I hope you have a go at making one of these. They are quick and simple. Even my kids altered their own tins (of course!!):


If you are a collage artist, why not consider adding your name the collage making directory? As of today there are 95 collage blogs listed! It is a great place to jump from when you need some collage inspiration. Scroll all the way down and leave a comment and you will be added to the list. 

LinkWithin

Related Posts with Thumbnails

Search This Blog