Step 1
So you have the piece that you want to make into a wall hanging. The next step is to mount it onto cardboard. Glue your art onto cardboard. I use glue stick and make sure to glue the corners as well as all over the back of the image. Lay a piece of clean paper over the image and rub with your hand to make sure it adheres well. Now use a steel ruler and craft knife to trim around the piece. TIP: If any of the cardboard is visible at the edges simply color over the grey with paint or pastels!

Step 2
Next use a ruler to mark two holes equal distances from either side. I made mine at about 1 1/4 inch in from the side. Use a drill or dremel with a 7/64" drill bit to make the holes.

Step 3
To give the holes a finished look glue eyelets into the holes. I used gel medium here, but any semi liquid glue would work like Modge Podge or even Elmers school glue. Leave them to dry for a while (longer dry time for these semi liquid glues).

Step 4
Trim a piece of 24 gauge wire about 6 or 7 inches long. I always cut it longer than I need just in case I make a mistake or decided to curl the wire or something else decorative.

Step 5
Put the wire through one hole. Fold it up on itself and twist it back on itself to secure. Bend it over to the other hole making an arc and secure it to the other hole.

And Viola! Wall hanging. Once I was done I decided that this piece needed something more so I added the 'dream' Rub On to the edge:

Well now this wall hanging is in it's new home with Katie of The Nesting Spot. She picked it as her prize last week and was so sweet to post her win on her blog, thank you Katie for the shout out!
Which leads me to this weeks giveaway:
Today's giveaway winner, chosen by the Random Number Generator, is -
Rowena of Warrior Girl
Congratulations!
Pick your prize from the choices below (click on image to see a larger image) and post it in the comments. I will contact you via email so you can send me, privately, your physical address.
Choice #1 - A printed canvas fabric glasses care with satin ribbon strap

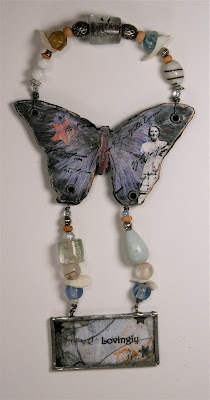
Choice #2 - A butterfly on balsa wood with soldered charm that reminds you to 'serve lovingly'.

Choice #3 - A pair of brown soldered earrings that say 'believe' and 'truth'.

For everyone else - Please check back in next Saturday to see if you win something. I will offer a new set of prizes. I will try to offer a range of things in the hopes something will appeal to you when it's your turn! And thank you for being a part of 'An Artful Life'.
And of course, if you are not listed as following this blog, you are welcome to do so! Join in the fun.
what a lovely tutorial & giveaway!
ReplyDeleteGreat choices as usual, I love those earrings!
ReplyDeleteOh yay! Thank you so much. I was just about to post how I like this tutorial, and then I saw my name.
ReplyDeleteI am very excited. I think my luck is changing for the better in 2010! I almost never win these things.
I love the #2... the butterfly pendant and its message. I choose that one.
Thank you again for this lovely gift. :)
well done Rowena..great little wire hanging another project to have a go at.thanks for the tutorial Shona
ReplyDeleteCongratultions to Rowena!
ReplyDeleteSo, I am curious - since I've never really done this type of thing before - where do you get the rub ons???
Awesome tute, Shona. I love all of your tutorials. Thanks so much for sharing your knowledge with us. I feel empowered to create! Keepem' coming.
ReplyDeleteThank you all for checking in! Rowena I will email you for your address and get your butterfly in the mail Monday.
ReplyDeleteSara, about Rub ons - they come from the scrapbooking supply world. I have bought mainly word rub Ons, but you can get all kinds of images too. I have mainly got mine in the scrapbooking section of craft stores like Michaels and Hobby Lobby, but you can get them online too. Check out http://www.makingmemories.com/Products/categories/rub-ons/rub-ons
for a decent selection.
I like them cause they are an alternative to rubber stamps and give a cleaner more definite image than stamps. And they are super easy to use. The only problem is once you use it, that is it. I have little books of Rub ons with multiple copies of the same words so that takes off the pressure to get it perfect! The books I have are here http://www.creativeimaginations.us/store/CI_ArtWarehouse_Impress-Ons_SwatchBookImpress-Ons_3x.php
Shona
Love this tutorial! I'm looking forward to giving it a try soon!
ReplyDelete